Advanced CloudShell Customizations
Introduction
This topic describes how to use CloudShell configuration keys to customize and configure CloudShell. For the complete repository of our customer configuration keys, see Customer Configuration Keys Repository
For additional customizations, like changing labels and text in CloudShell Portal, see CloudShell Configuration Options.
How to use configuration keys
Some configurations involve setting configuration keys. Each configuration key should be copied into the appropriate customer.config file (typically located in the CloudShell Server or CloudShell Portal installation directory). The entire line must be added to the file as a new line and can be placed anywhere in the file before the closing </appSettings> tag. Then, restart the relevant component:
- For Server configurations, restart the Quali Server service in the Windows Services dialog box or run the Quali Server Configuration Wizard.
- For Portal configurations, restart the CloudShell Portal website via the IIS Manager or run the CloudShell Portal Configuration Wizard if the CloudShell Portal website is running on IIS Express.
How to use this article
In this article, you will find CloudShell keys, logically arranged in categories. For example, the Setting home page key = HomePageUrl is found under the General category both in the table (see Set the default home page (HomePageUrl) in the list of keys) and in the General category Setting the default home page.
The following categories are used to organize the configuration keys:
- Apps
- Connectivity management and route configuration
- Creating and viewing sandboxes
- Custom live status icons
- Blueprint Catalog
- Blueprint Workspace
- Execution Server
- General
- Inventory dashboard
- LDAP Integration
- Monitoring
- Online Help
- Registration, passwords, emails, and licenses
- Sandbox API
- Scheduling and Queuing
- Scheduling commands
- Search
- Single Sign On (SSO)
Apps
Setting the default category for new Apps
This configuration key enables you to specify the default category that will be selected for new Apps. The default category is "Apps".
Note: Only users that have permissions to the category's domain will have access to the App.
To set the default category for new Apps:
- Open the C:\Program Files (x86)\QualiSystems\CloudShell\Server\customer.config file.
Add the following key:
<add key="DefaultAppCategory" value="app category"/>Replace "
app category" with the new default category.To set a sub-category, use "/". For example,
Apps/My App Category"(where "My App Category" is the sub-category).- Restart the Quali Server service.
Enabling the modification and deletion of App templates only from the template's domain
This key disables the options to edit or delete an App template when the admin is not in the domain in which the App was created. By default, Apps templates can be modified rom any CloudShell domain.
- This key does not restrict system admins from editing Apps in other domains.
- This key does not apply to the "clone App" option.
To enable this restriction:
Open the C:\Program Files (x86)\QualiSystems\CloudShell\Portal\customer.config file, add the following key, and set the value accordingly (the default is 6 hops, or 6 switches):
<add key="RestrictEditToCreatingDomain" value="True"/>- Restart the CloudShell Portal IIS service.
Connectivity management and route configuration
For more information about the connection types, see Add Physical Network Connectivity Requirements.
Setting max hops for routes
You can set the maximum allowed hops for route resolution to cap the number of chassis connections that can be used when resolving a route. The default value is 6 hops, or 6 switches.
To change the max hops settings for routes:
Open the C:\Program Files (x86)\QualiSystems\CloudShell\Server\customer.config file, add the following key, and set the value accordingly (for example, 10 hops):
<add key="MaxHopsForRoute" value="10"/>- Restart the Quali Server service.
Setting default max hops for routes
This key defines the default value to display in the connection line's Max Hops property in the Resource Connections dialog box. The default value is 2 hops.
To change the default max hops settings for routes:
Open the C:\Program Files (x86)\QualiSystems\CloudShell\Server\customer.config file, add the following key, and set the value accordingly (for example, 10 hops):
<add key="DefaultMaxHopsForRoute" value="10"/>- Restart the Quali Server service.
Enabling automatic route configuration
You can enable the server to automatically configure the L1 connections to support the maximum possible speed for the selected route, based on the end point port and their connected L1 speed capabilities. Once enabled, CloudShell will look for an attribute called Speed on both endpoints of the L1 route, and when the route gets connected in a sandbox, the server will change the attribute’s value on both endpoints to the highest mutually supported speed.
To enable automatic route configuration:
Open the C:\Program Files (x86)\QualiSystems\CloudShell\Server\customer.config file, add the following key, and set the value accordingly:
<add key="EnableRouteConfiguration" value="True"/>- Restart the Quali Server service.
Set the supported connection types for new connections
You can set the supported connection types for new connections from these default values: Route, Cable, Tap, Connector. This key allows you choose the connection types to include in CloudShell, disabling any values you don't specify. To set these connection types, just specify their name, comma separated, as the key value.
To set the supported connection types for new connections:
Open the C:\Program Files (x86)\QualiSystems\CloudShell\Portal\customer.config file, add the following key, and set the value accordingly by specifying the connection types you want to include:
<add key="SupportedConnectionTypes" value=""/>- Restart the CloudShell Portal IIS service.
Creating and viewing sandboxes
Allowing users to reserve existing blueprints only
In some cases, it can be undesirable to allow regular users to create new blank sandboxes. For example, sandboxes that are not based on blueprints cannot run setup scripts that perform important configuration steps on the sandbox, such deploying App VMs and preparing connectivity for public cloud Apps, such as AWS EC2 and Azure.
To enforce the rule that users reserve existing blueprints only:
Open the C:\Program Files (x86)\QualiSystems\CloudShell\Server\customer.config file, and add the following key:
<add key="RegularUserCanCreateEmptyReservation" value="False"/>- Restart the Quali Server service.
Unlocking sandboxes for use during the Setup process
This applies to sandboxes that either use the Default Sandbox Setup script or a modified version of the script. Note that these restrictions do not apply to API methods.
During the Setup process, CloudShell prevents users from performing certain actions in the sandbox. This restriction both protects the Setup process from unexpected changes and avoids situations where the user makes changes to the sandbox and the Setup process overrides them.
The following actions cannot be performed in the sandbox during Setup:
- Run commands
- Add or remove resources, services and Apps
- Remotely connect to sandbox elements via QualiX
To enable users to interact with sandboxes during setup:
Open the C:\Program Files (x86)\QualiSystems\CloudShell\Server\customer.config file, and add the following key:
<add key="BlockSandboxDuringSetup" value="False"/>- Restart the Quali Server service.
Enabling extended permissions for external users
An external user is limited in the ways they are able to interact with CloudShell Portal. By default, an external user is not allowed to create new sandboxes, for example.
An external user with extended permissions can also perform actions such as:
- Resources and Apps: Viewing and controlling the resources in a blueprint or sandbox. This includes managing connections and moving elements in the diagram, viewing resource attributes and commands, and connecting to devices and VMs from the sandbox diagram (using remote connection protocols such as Telnet, SSH, and RDP).
- Blueprints: Using advanced settings when reserving a blueprint and resolving reservation conflicts.
- Sandboxes: Controlling the duration of the sandbox, changing the sandbox properties and input values, exporting diagrams and connections, downloading file attachments, and viewing the sandbox's Instructions and Activity feed.
To enable extended permissions for external users:
Open the C:\Program Files (x86)\QualiSystems\CloudShell\Server\customer.config file, and add the following key:
<add key="ExternalUserHasExtendedPermissions" value="True"/>- Restart the Quali Server and CloudShell IIS Portal services.
Allowing sandboxes to be shared only with users in the same group
By default, the user can share their own sandbox with anyone in the same domain. If you enable this key, only users in the same CloudShell group as the user who created a particular sandbox can use it.
To restrict the possible users to users in the same group:
Open the C:\Program Files (x86)\QualiSystems\CloudShell\Server\customer.config file, and add the following key:
<add key="PickOnlyUsersFromLoggedInUserGroups" value="True"/>- Restart the Quali Server service.
Preventing users reserving a blueprint from viewing Owner and Permitted Users details
This key controls whether to display the Owner and Permitted Users details when creating a sandbox (in the Reserve dialog box). When enabled, the Owner and Permitted Users sections will display only the details of the logged in user. If the logged in user is not the designated owner, the Owner section will be empty.
This option is disabled by default.
To prevent users reserving a blueprint from viewing Owner and Permitted Users details:
Open the C:\Program Files (x86)\QualiSystems\CloudShell\Server\customer.config file, and add the following key:
<add key="PickOnlyLoggedInUser" value="True"/>- Restart the Quali Server service.
- Then, restart the CloudShell Portal IIS service.
Preventing users from using the "Reserve Anyway" option to create sandboxes with conflicts
In some cases, it may be undesirable to allow users to use the Reserve Anyway option to create a sandbox with conflicts.
To remove the Reserve Anyway option from the interface:
Open the C:\Program Files (x86)\QualiSystems\CloudShell\Server\customer.config file, and add the following key:
<add key="BlockReserveWithConflicts" value="True"/>- Restart the Quali Server service.
Allowing regular users to view sandboxes of other users in their domain
By default, all users in the same domain have visibility of each other’s sandboxes. You can disable this with the following key.
To disable non admin users from viewing sandboxes other than their own:
Open the C:\Program Files (x86)\QualiSystems\CloudShell\Server\customer.config file, and add the following key:
<add key="ShowOtherUserInDomainReservations" value="False"/>- Restart the Quali Server service.
Setting the default duration for new sandboxes
The default value for all new sandboxes is two hours.
To change the default duration for new sandboxes:
Open the C:\Program Files (x86)\QualiSystems\CloudShell\Server\customer.config file, add the following key and set the value accordingly:
<add key="Reservation.DefaultDuration" value="2"/>- Restart the Quali Server service.
Disabling the "Recurrence" option when creating sandboxes
When creating a sandbox, the sandbox can be set to repeat on a schedule. By default, this option is enabled.
Note that this does not prevent users from modifying existing recurrence settings.
To disable the Recurrence option:
Open the C:\Program Files (x86)\QualiSystems\CloudShell\Server\customer.config file, add the following key and set the value accordingly:
<add key="EnableRecurringReservation" value="False"/>- Restart the Quali Server service.
- Restart the CloudShell Portal IIS service.
Setting the default build duration
The default estimated duration in hours for a build if no Setup/Teardown is defined.
To change the default build duration:
Open the C:\Program Files (x86)\QualiSystems\CloudShell\Server\customer.config file, add the following key and set the value accordingly:
<add key="Build.DefaultDuration" value="24"/>- Restart the Quali Server service.
Setting the default maximum concurrent sandboxes limit for each user
By default, users are not restricted to a certain number of concurrent sandboxes. You can apply this constraint for all new users. It is possible to change the value for specific users later using the application or the API.
To apply this constraint for all new users:
Open the C:\Program Files (x86)\QualiSystems\CloudShell\Server\customer.config file, add the following key and set the value for the specified number of sandboxes:
<add key="DefaultUserMaxConcurrentReservations" value="2"/>- Restart the Quali Server service.
Setting the default maximum scheduled sandboxes limit for CloudShell users
This key enables you to set the default number of maximum scheduled sandboxes for all users in CloudShell. By default, new users are allowed to have up to 10 scheduled sandboxes while users migrated from a pre-9.3 Patch 2 version (during upgrade) have an empty value (unlimited). Value "0" means users can only start immediate reservations (no scheduled). Note that admins can change the default for specific users using Resource Manager Client or the API.
To apply this constraint for all new users:
Open the C:\Program Files (x86)\QualiSystems\CloudShell\Server\customer.config file, add the following key and set the value for the specified number of sandboxes:
<add key="DefaultUserMaxScheduledSandboxes" value="2"/>- Restart the Quali Server service.
Setting the default maximum number of saved sandboxes for CloudShell users
Note: This only applies if you are using the Save and Restore paid add-on.
By default, users are allowed to save as many sandboxes as they require. This is done using the DefaultUserMaxSavedSandboxes key. This key applies only to new users or users created in a CloudShell version prior to 9.0 that are migrated for the first time. The default value is empty (unlimited).
Note: Admins can override the default for specific users in Resource Manager Client.
To set the default maximum number of saved sandboxes:
Open the C:\Program Files (x86)\QualiSystems\CloudShell\Server\customer.config file, add the following key and set the value:
<add key="DefaultUserMaxSavedSandboxes" value="2"/>- Restart the Quali Server service.
Setting the default maximum sandbox duration limit for each user
By default, users are not restricted to sandboxes up to a certain duration. Using this key, you can apply a maximum duration limit for all new users. It is possible to change the value for specific users later using the application or the API.
To apply this constraint for all new users:
Open the C:\Program Files (x86)\QualiSystems\CloudShell\Server\customer.config file, add the following key and set the number of minutes as the value (for example, 2 days):
<add key="DefaultUserMaxReservationDuration" value="2:00:00:00"/>- Restart the Quali Server service.
Specifying which side panes should be open by default
It is possible to specify that either the instructions side pane or the blueprint commands side pane be opened by default in the Sandboxes pages.
To specify which side panes should be open by default:
Open the C:\Program Files (x86)\QualiSystems\CloudShell\Portal\customer.config file, and add the appropriate key:
<add key="WS_Reservation_AutoOpenInstructions" value="True"/><add key="WS_Reservation_AutoOpenCommands" value="True"/>- Restart the CloudShell Portal IIS service.
Controlling whether sandboxes should end automatically
The server can end sandboxes automatically when their end time arrives, or allow them to go into overtime. Sandboxes that have resources that are marked “in use” can go into overtime when their time ends. Using this configuration key, you can enable sandboxes to go into overtime when their time ends. By default, sandboxes end automatically without going into overtime.
Important: It is not recommended to enable Overtime since it makes managing and troubleshooting conflicts more difficult.
To enable overtime (have sandboxes not end automatically if "in use" resources are present):
Open the C:\Program Files (x86)\QualiSystems\CloudShell\Server\customer.config file, and add the following key:
<add key="AutoEndReservation" value="False"/>- Restart the Quali Server service.
Showing the Mark "in use" option for resources
This key determines whether the mark in use option is available for sandbox resources. For details see Mark Resources "in use".
To display the Mark "in use" option:
Open the C:\Program Files (x86)\QualiSystems\CloudShell\Server\customer.config file, and add the following key:
<add key="HideMarkInUseAction" value="False"/>- Restart the Quali Server service.
Preventing regular users from reserving shared resources exclusively
Administrators can specify that resources marked as "Shared by default" cannot be "unshared" by a regular user. The intent is to apply a policy that prevents exclusive access to some devices, which are meant as shared.
To prevent regular users from reserving shared resources exclusively:
Open the C:\Program Files (x86)\QualiSystems\CloudShell\Server\customer.config file, and add the following key:
<add key="NonAdminCanUnshareResource" value="False"/>- Restart the Quali Server service.
Preventing non admin users from viewing the physical sandbox layer
Administrator can prevent non-admin users from using the Show Physical Layer functionality in the web portal, which exposes him to the L1, patch panel, and other physical layer devices.
To prevent users from viewing the physical sandbox layer:
Open the C:\Program Files (x86)\QualiSystems\CloudShell\Server\customer.config file, and add the following key:
<add key="NonAdminCanViewPhysicalLayerInReservation" value="False"/>- Restart the Quali Server service.
Enabling HTML formatting in system and command messages
HTML formatting such as rich text and hyperlinks is displayed by default in the Output console, Activity Details, and Commands side panes. For security reasons, <script> tags are disabled by design.
Note: Before you begin writing your scripts, you must determine your required output format. If you require a special format other than HTML (for example, XML), you need to set this key to False in order to prevent unexpected behavior and erroneous output.
To disable HTML formatting:
Open the C:\Program Files (x86)\QualiSystems\CloudShell\Portal\customer.config file, add the following key, and set the value to
False:<add key="CommandsOutputConsoleSupportsHtml" value="True"/>- Restart the CloudShell Portal IIS service.
Enabling users to create ad hoc sandboxes
Administrators can enable CloudShell users to start a new sandbox from scratch (ad hoc). Ad hoc sandboxes can be based on existing blueprints or by starting a blank sandbox, to which components such as resources and services can be added.
By default, sandboxes can only be created from existing blueprints.
Note: Apps based on a public cloud provider, such as AWS EC2 and Azure, cannot be used when creating an ad hoc sandbox. For additional information, see Add Apps.
To enable users to create ad hoc sandboxes:
Open the C:\Program Files (x86)\QualiSystems\CloudShell\Server\customer.config file, and add the following key:
<add key="HideCreateNewEmptyReservation" value="False"/>- Restart the Quali Server service.
- Then, restart the CloudShell Portal IIS service.
Preventing CloudShell from switching to the domain of a sandbox/blueprint when accessing via URL
By default, when trying to open a URL to a sandbox from a domain you can access but are not currently logged into, CloudShell prompts the user to switch to the domain (assuming the blueprint is public and the user is permitted to access the sandbox/blueprint). If the user confirms the switch, CloudShell will then open the sandbox/blueprint in its domain. However, you can choose to prevent this domain switch by setting the AutoSwitchDomain key. For additional information, see Opening Sandboxes.
Note: When opening a blueprint from a URL, the domain switch only works if the blueprint URL includes the domain ID. To obtain a blueprint URL with the domain ID, use the CloudShell Automation API's GetTopologyUrls method.
To disable the domain switch when accessing a sandbox/blueprint link:
Open the C:\Program Files (x86)\QualiSystems\CloudShell\Server\customer.config file, and add the following key:
<add key="AutoSwitchDomain" value="False"/>- Restart the Quali Server service.
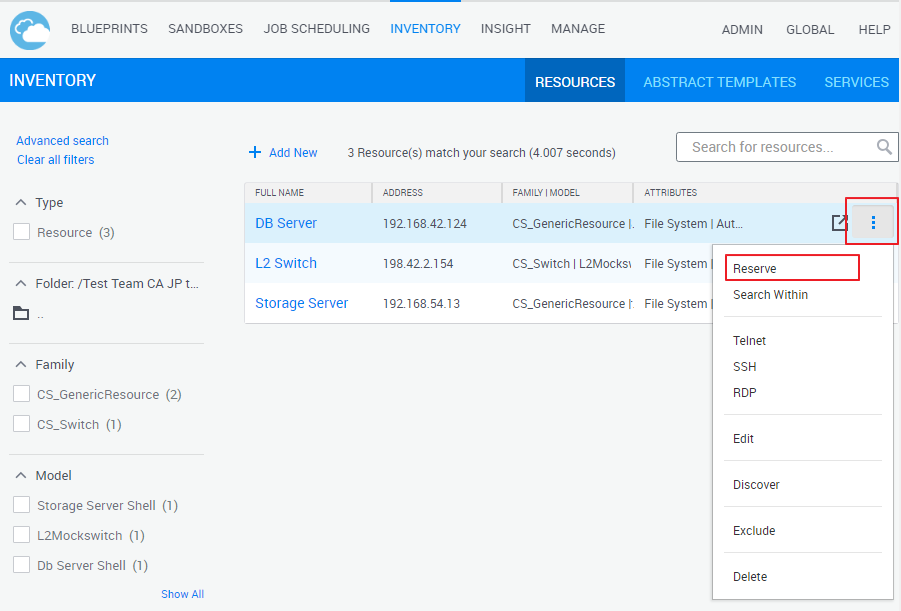
Show/hide user/sandbox details of currently shared resources in CloudShell Portal
The ShowSharedResourceUsage key determines whether to display the list of users and sandboxes that are currently using a shared resource, when viewing the resource's information in the Inventory dashboard or Add Resources catalog in a blueprint/sandbox.
By default, this information is displayed, as illustrated in this image:

To hide user/sandbox details on a shared resource:
Open the C:\Program Files (x86)\QualiSystems\CloudShell\Server\customer.config file, and add the following key:
<add key="ShowSharedResourceUsage" value="False"/>- Restart the Quali Server service.
Set List view as the default for sandbox workspaces
By default, when you open a sandbox, the sandbox's elements are displayed in Diagram view. However, you can choose to change the default display mode to List view, using this key. For additional information, see Sandbox List View.
To set List view as the default:
Open the C:\Program Files (x86)\QualiSystems\CloudShell\Server\customer.config file, and add the following key:
<add key="ShowListViewByDefault" value="True"/>- Restart the CloudShell Portal IIS service.
Preventing regular users from adding/removing resources in sandboxes
By default, CloudShell enables regular users to add and remove resources in the sandbox. To block this option, enable the following key. As a result, the Resource button in the sandbox toolbar will be hidden in the active sandbox.
Note that this does not apply to admins (who have full access permissions), or external users (who are unable to modify the sandbox diagram).
To prevent regular users from adding/removing resources in the sandbox:
Open the C:\Program Files (x86)\QualiSystems\CloudShell\Server\customer.config file, and add the following key:
<add key="BlockAddRemoveResourcesInSandbox" value="True"/>- Restart the Quali Server service.
Custom live status icons
Modifying the list of custom live statuses
The system supports custom statuses for resources which can also be visualized using different icons.
To define the custom statuses and their icons:
Open the %programdata%\QualiSystems\Settings\Global\ServerUniversalSettings.xml file, and in the
ResourcesLiveStatussection, add a new key (where the name is the status name and value is the icon path), for example:<ResourcesLiveStatus> … <key name="CustomStatus">C:\ProgramData\QualiSystems\Portal\Content\Images\cust.png</key> </ResourcesLiveStatus>- Save the file.
Blueprint Catalog
The main page of the Blueprint Catalog, when no specific category is selected, can be customized to contain any or none of the following sections. This is done by adding the relevant configuration key in the customer.config file in the CloudShell Server installation directory. Note that each of the sections described below do not appear if there are no relevant blueprints to display.
New Blueprints section
To display new published blueprints, ordered by date of creation:
Open the C:\Program Files (x86)\QualiSystems\CloudShell\Server\customer.config file, and add the following key:
<add key="TopologyDashboardNewTopologies" value="True"/>- Restart the Quali Server service.
To control the maximum number of new blueprints:
Add the following key and set the value (the default is 5):
<add key="NewTopologiesCategoryCount" value="5"/>- Restart the Quali Server service.
To restrict the maximum number of days a blueprint can be considered ‘new’:
Add the following key and set the value to specify the number of days (the default is
-1for no restriction):<add key="NewTopologiesCategoryDaysLimit" value="20"/>- Restart the Quali Server service.
Recently modified blueprints
This Blueprint Catalog's Featured view includes a Recently Modified section, which displays recently-modified private and public blueprints owned by the user, ordered by the modification date. This makes it convenient to quickly find a blueprint after creating/modifying it.
Note: This section will not appear if no blueprints are owned by the user.
To enable displaying recently modified blueprints:
Open the C:\Program Files (x86)\QualiSystems\CloudShell\Server\customer.config file, and add the following key:
<add key="TopologyDashboardRecentlyModified" value="True"/>- Restart the Quali Server service.
To control the maximum number of recently modified blueprints:
Add the following key and set the value (the default is 5):
<add key="RecentlyModifiedTopologiesCategoryCount" value="5"/>- Restart the Quali Server service.
Recently reserved blueprints
The Blueprint Catalog's Featured view includes a Recently Reserved section, which displays recently reserved blueprints in which you are either the owner or a permitted user. If you never reserved blueprints, this section will be hidden. Using the below keys, you can choose to show/hide this section and set the maximum number of recently reserved blueprints to include.
To enable displaying recently reserved blueprints:
Open the C:\Program Files (x86)\QualiSystems\CloudShell\Server\customer.config file, and add the following key:
<add key="TopologyDashboardRecentlyReserved" value="True"/>- Restart the Quali Server service.
To control the number of recently reserved blueprints to appear in "Recently Reserved" within the Featured section of the Blueprint Catalog:
Add the following key and set the value (the default is 5)
<add key="RecentlyReservedTopologiesCategoryCount" value="5"/>- Restart the Quali Server service.
Featured categories
This key can be used to set one or more blueprint categories whose blueprints will be displayed in the Featured section of the Blueprint Catalog To set these categories, just specify their name, comma separated, as the key value.
To enable displaying featured categories:
Open the C:\Program Files (x86)\QualiSystems\CloudShell\Server\customer.config file, and add the following key:
<add key="TopologyDashboardFeaturedCategories" value="Category 1, Category 2"/>- Restart the Quali Server service.
Hiding the Featured section
These keys control whether to display the Featured section in the Blueprint Catalog. When disabled, all blueprints will appear in a single section in the catalog.
To disable the Featured section:
Open the C:\Program Files (x86)\QualiSystems\CloudShell\Server\customer.config file, and change the following keys' values to False:
<add key="TopologyDashboardNewTopologies" value="False"/><add key="TopologyDashboardRecentlyModified" value="False"/><add key="TopologyDashboardRecentlyReserved" value="False"/>- In addition, make sure to either remove the
TopologyDashboardFeaturedCategorieskey from the customer.config file or set it to an empty value. - Restart the Quali Server service and the CloudShell Portal IIS service.
All blueprints
This key controls whether to display all blueprints in the main Blueprint Catalog, when no category is selected.
To enable displaying all blueprints:
Open the C:\Program Files (x86)\QualiSystems\CloudShell\Server\customer.config file, and add the following key:
<add key="TopologyDashboardAllTopologies" value="True"/>- Restart the Quali Server service.
There are two supported modes for displaying the blueprints: as one group, or categorized alphabetically (default).
To disable alphabetic sub-grouping:
Open the C:\Program Files (x86)\QualiSystems\CloudShell\Server\customer.config file.
Add the following key: and set the value to
False:<add key="ShowAlphabeticTopologySubCategories" value="True"/>- Restart the Quali Server service.
Hiding the “Status” filter
As of CloudShell 6.2.3, an administrator can show/hide the Status filter from the Blueprint Catalog.
To show/hide the "Status" filter:
- Open the C:\Program Files (x86)\QualiSystems\CloudShell\Portal\customer.config file, and add the following key:
<add key="HideEnvironmentsStatusFilter" value="False"/> - To show the option, set the value to
False. To hide the option, set the value toTrue. - Restart the CloudShell Portal IIS service.
Enabling blueprints of “view” type
As of CloudShell 6.2.3, an administrator can enable users to set blueprints to type “view”. Blueprints of type “view” cannot be edited, deleted or reserved by users with view permissions.
To enable View blueprints:
- On a 64-bit Windows machine, open the folder C:\Program Files (x86)\QualiSystems\CloudShell\Server.
- On a 32-bit Windows machine, open the folder C:\Program Files\QualiSystems.
- Open the customer.config file.
Add the following key:
<add key="EnableEnvironmentTypeView" value="True"/>- Restart the Quali Server service.
Enabling blueprints of "build" type
An administrator can enable users to set blueprints to type “build”. Build blueprints are designed to run specific automation processes in a blueprint. For example, to set up and provision lab equipment. They do not have a duration and need to be stopped manually or via API.
To enable Build blueprints:
- On a 64-bit Windows machine, open the folder C:\Program Files (x86)\QualiSystems\CloudShell\Server.
- On a 32-bit Windows machine, openthe folder C:\Program Files\QualiSystems.
- Open the customer.config file.
Add the following key:
<add key="EnableEnvironmentTypeBuild" value="True"/>- Restart the Quali Server service.
Enabling the creation of empty blueprints
As an administrator you can enable users to create empty blueprints, which are not based on any predefined template and do not include out-of-the-box setup and teardown scripts.
To enable users to create blank blueprints:
Go to C:\Program Files (x86)\QualiSystems\CloudShell\Server\customer.config file, and add the following key:
<add key="OnlyAllowNewEnvironmentsFromTemplates" value="false"/>- Restart the Quali Server service.
Enabling users to create empty blueprints changes the behavior of the + Create Blueprints button.
The following table describes all the possible behaviors:
Activity | Key value set to 'False' | Key value set to 'True' |
|---|---|---|
A single template is defined | Clicking + Create Blueprint opens the drop-down list which includes the default out-of-the-box CloudShell Sandbox Template. The Create Empty Blueprint button is available. | Clicking + Create Blueprint creates a new blueprint based on the default out-of-the-box CloudShell Sandbox Template. The Create Empty Blueprint button is not available. |
Multiple templates are defined | Clicking + Create Blueprint opens the drop-down list containing all available templates. The Create Empty Blueprint button is available. | The Add New Blueprint button is available. Clicking + Create Blueprint opens the drop-down list containing all available templates. The Create Empty Blueprint button is not available. |
Blueprint Workspace
Setting the maximum allowed teardown time for blueprints
The default maximum value for teardown time for blueprints is 48 hours.
To change the maximum allowed teardown time:
Oepn the C:\Program Files (x86)\QualiSystems\CloudShell\Server\customer.config file, and add the following key:
<add key="TopologyTeardownDurationMaxHours" value="24"/>- Restart the Quali Server service.
Setting the maximum allowed setup time for blueprints
The default maximum value for setup time for blueprints is 48 hours.
To change the maximum allowed setup time:
Open the C:\Program Files (x86)\QualiSystems\CloudShell\Server\customer.config file, and add the following key:
<add key="TopologySetupDurationMaxHours" value="24"/>- Restart the Quali Server service.
Hiding the “More Info” option
As of CloudShell 6.2.3, an administrator can enable the option to show/hide the More Info option from blueprints.
To show/hide the More Info option:
Open the C:\Program Files (x86)\QualiSystems\CloudShell\Portal\customer.config file, and add the following key:
<add key="HideMoreInfoOnEnvironmentTile" value="False"/>- To show the option, set the value to
False. To hide the option, set the value toTrue. - Restart the CloudShell Portal IIS service.
This change applies to all the blueprints in the catalog, in both Tile and List View modes.
When hiding the More Info option, it still remains available in the Blueprint menu of the blueprint's workspace.
Specifying which side panes should be open by default
It is possible to specify that either the instructions side pane or the blueprint commands side pane be opened by default in the Blueprints pages.
To specify which side panes should be open by default:
Open the C:\Program Files (x86)\QualiSystems\CloudShell\Portal\customer.config file, and add the appropriate key:
<add key="WS_Environment_AutoOpenInstructions" value="True"/><add key="WS_Environment_AutoOpenCommands" value="True"/>- Restart the CloudShell Portal IIS service.
Blocking non-admin users from exporting a blueprint package
As an administrator you can block non-admin users from exporting a blueprint package. This option is disabled by default.
To block non-admin users from exporting a blueprint package:
Go to C:\Program Files (x86)\QualiSystems\CloudShell\Server\customer.config file, and add the following key:
<add key="BlockPackageExportForNonAdmins" value="True"/>- Restart the Quali Server service.
Enabling the Check Blueprint Routes option
Use this key to show the Check Blueprint Routes option in the Blueprint menu. For additional information, see Check Blueprint Routes.
To enable the Check Blueprint Routes option:
Go to C:\Program Files (x86)\QualiSystems\CloudShell\Server\customer.config file, and add the following key:
<add key="DetectFailedRoutes" value="True"/>- Restart the Quali Server service.
Execution Server
For execution server configurations and customizations, see Setting Up Execution Servers to Run Commands.
General
Controlling the visibility of the main navigation bar components
You can control which components will be visible to the user using the main menu bar. This removes some features from the user’s view.
To remove/hide the Scheduling and Queuing component:
Open the C:\Program Files (x86)\QualiSystems\CloudShell\Portal\customer.config file, and add the following key:
<add key="HideSnQ" value="True"/>- Restart the CloudShell Portal IIS service.
To remove/hide the Sandboxes component:
Open the C:\Program Files (x86)\QualiSystems\CloudShell\Portal\customer.config file, and add the following key:
<add key="HideReservations" value="True"/>- Restart the CloudShell Portal IIS service.
To remove/hide the Blueprints component:
Open the C:\Program Files (x86)\QualiSystems\CloudShell\Portal\customer.config file, and add the following key:
<add key="HideTopologies" value="True"/>- Restart the CloudShell Portal IIS service.
To remove/hide the Inventory component:
Open the C:\Program Files (x86)\QualiSystems\CloudShell\Portal\customer.config file, and add the following key:
<add key="HideInventory" value="True"/>- Restart the CloudShell Portal IIS service.
Configuring the CloudShell Portal virtual front
This key is used for two reasons:
- To set the CloudShell Portal virtual front in a high availability configuration. For details, see this article.
- To include a sandbox link in email notifications.
To configure the CloudShell Portal:
- Go to the C:\Program Files (x86)\QualiSystems\CloudShell\Server folder and open the customer.config file.
Add the following key to the file. This key sets the virtual front address to be used in emails sent from CloudShell to users.
<add key="PortalAddressLinkForEmails" value="protocol://PublicServerName:PortalPort"/>Modify the key's values:
Parameter Parameter details protocolhttp or https if CloudShell Portal is set to use SSL PublicServerNameThe DNS name or IP address of the CloudShell Portal virtual front PortalPortThe port which CloudShell Portal is using (If the port is 80 or 443, which are the default http and https ports, remove this parameter and the colon from the key). - Restart the Quali Server service.
Setting the default home page
The web application directs the user to the last dashboard that was visited upon login. You can determine the default page that users are directed to upon first time login.
To set the default home page:
Open the C:\Program Files (x86)\QualiSystems\CloudShell\Portal\customer.config file, and add the following key:
<add key="HomePageUrl" value="/RM/Topology "/>Note: The value of the configuration key should be the relative path of the first page the user needs to be directed to, which can be taken from the address bar of each dashboard.
- Restart the CloudShell Portal IIS service.
Adding the "Contact Us" option to the user menu in CloudShell Portal
It is possible to add a "contact us" option to the user menu in CloudShell Portal. When clicked, it opens the webpage you configure in this key. You could use this feature, for example, to receive feedback and feature requests from your customers.
This option is disabled by default.
To add a "Contact Us" option to CloudShell Portal:
Open the C:\Program Files (x86)\QualiSystems\CloudShell\Portal\customer.config file, and add the following key:
<add key="ContactUsURL" value="<webpage-url>"/>Where
<webpage-url>is the URL to your contact form.- Restart the CloudShell Portal IIS service.
To disable the "Contact Us" option:
- Remove the key from the customer.config file.
- Restart the CloudShell Portal IIS service.
Setting a page to redirect to after logout from CloudShell Portal
By default, when users log out of CloudShell Portal, they are redirected to your custom login page. You can change this setting to redirect users to another page, such as your main homepage or a page that offers additional information.
To set the redirected login page to a custom location:
- Open the C:\Program Files (x86)\QualiSystems\CloudShell\Portal\customer.config file, and add the following key:
<add key="CustomAbsoluteLoginPage" value="http://anyurl"/> - Restart the CloudShell Portal IIS service.
Configuring CloudShell to import user definitions from an active directory
The following procedures explain how to enable the import of users from your corporate Microsoft Active Directory into CloudShell. To import user definitions, see Importing users into CloudShell from an active directory. Note that the passwords of imported users are managed by the active directory itself.
Prerequisite: The computer that will be used to import the users must be in your corporate domain.
To enable the import of active directory users:
Open the C:\Program Files (x86)\QualiSystems\CloudShell\Server\customer.config file, and add the following key:
<add key="ActiveDirectory.Domain" value="QUALISYSTEMS"/>- Set the key to the name of the domain of the active directory, for example,
Router_UK. - Save the modified customer.config file.
- Restart the Quali Server service.
- Import the users into Resource Manager Client, as explained in Importing users into CloudShell from an active directory.
Configuring CloudShell to automatically import users from an external system at login
This key enables CloudShell to automatically import users from an active directory or LDAP when they log in to CloudShell for the first time. Note that the passwords of imported users are managed by the directory service provider itself.
This option is disabled by default.
To enable CloudShell to auto-import users when they log in:
Open the C:\Program Files (x86)\QualiSystems\CloudShell\Server\customer.config file, and add the following key:
<add key="ExternalUserManagement.AutoImportUser" value="True"/>- Save the customer.config file.
- Restart the Quali Server service.
Advanced: Randomized abstract resource selection
By default, the abstract resource selection process is randomized in order to reduce clashes when blueprints are resolved in parallel.
To make abstract resolution none randomized:
Open the C:\Program Files (x86)\QualiSystems\CloudShell\Server\customer.config file, and add the following key:
<add key="RandomizeAbstractSelection" value="False"/>- Restart the Quali Server service.
Defining the Instructions pane size
You can control the width, in pixels, of the Instructions pane in a blueprint or sandbox. The default value is 540 pixels.
To set the width of the Instructions pane:
Open the C:\Program Files (x86)\QualiSystems\CloudShell\Portal\customer.config file, and add the following key:
<add key="WS_InstructionsPanelWidth" value="500"/>- Restart the CloudShell Portal IIS service.
Note: This setting applies to all blueprints in the system.
Disabling DBCC TRACEON (sql_sysadmin_membership_exists)
Set to False to disable DBCC TRACEON (sql query execution performance). This requires membership in the sysadmin fixed server role. Default is True.
To disable DBCC TRACEON:
Go to C:\Program Files (x86)\QualiSystems\CloudShell\Server\customer.config file, and add the following key:
<add key="sql_sysadmin_membership_exists" value="False"/>- Save the file and restart the Quali Server service.
Hiding Drivers management page (Manage dashboard)
This key determines if the Manage dashboard's Drivers tab is visible. By default, the Drivers tab is hidden. This tab is relevant only when developing or customizing 1st Gen shells.
To display the Drivers tab:
Open the C:\Program Files (x86)\QualiSystems\CloudShell\Portal\customer.config file, and add the following key:
<add key="HideDriversTabInManage" value="False"/>- Restart the CloudShell Portal IIS service.
Setting the default python version for new python scripts
This key determines which python version will be used by default for new python scripts the admin loads into CloudShell. Note that you can change the default setting for a script in the Scripts management page, as explained in Editing scripts.
Python 2 is the default.
Important: Python 3 automation requires Microsoft Visual C++ Redistributable 2015 to be installed on the Execution Server(s).
To set the default python version for new scripts:
Go to C:\Program Files (x86)\QualiSystems\CloudShell\Server\customer.config file, and add the following key:
<add key="DefaultPythonVersion" value="<python version>"/>- Replace
<python version>with the appropriate option: Python 2 or Python 3. - Save the file and restart the Quali Server service.
Inventory dashboard
Allowing regular users to reserve resources from the Inventory dashboard
By default, only admins can reserve resources from the Inventory dashboard. For additional information about this option, see Reserving Resources from the Inventory.
To allow regular users to reserve resources from the Inventory dashboard:
Open the C:\Program Files (x86)\QualiSystems\CloudShell\Portal\customer.config file, and add the following key:
<add key="AllowRegularUsersToReserveFromInventory" value="True"/>- Save the customer.config file.
- Restart the CloudShell Portal IIS service.
LDAP Integration
For information about integration with an LDAP server, see LDAP Integration.
Monitoring
Setting the duration for CloudShell Monitor logs
By default, CloudShell Monitor collects logs that were created or modified within the last 14 days. Using this key, you can change this period. For example, to limit the size of the logs.
To set the duration for CloudShell Monitor logs:
Open the C:\Program Files (x86)\QualiSystems\CloudShell\Monitor\monitor.config file, and add the following key (value in days):
<add key="ProductLogsDaysBackFilter" value="10"/>- Save the monitor.config file.
- Restart the CloudShell Monitor application.
Disabling the export of usage data to Quali
By default, Quali exports CloudShell usage data to help us improve CloudShell. If you do not want to share this data, set the EnableWatcher key to False.
Note that disabling this key does not prevent CloudShell from sending usage data to CloudShell Monitor, but you can prevent that from happening by disabling the AddUsageDataToMonitoring key.
To disable the export of usage data to Quali:
Go to C:\Program Files (x86)\QualiSystems\CloudShell\Server\customer.config file, and add the following key:
<add key="EnableWatcher" value="False"/>- Save the file and restart the Quali Server service.
Disabling the export of usage data to CloudShell Monitor
By default, CloudShell Monitor collects CloudShell usage data, which you can retrieve by saving CloudShell system logs, as explained in the Collecting Logs article of the Troubleshooting Guide. If you do not want CloudShell Monitor to collect this data, set the AddUsageDataToMonitoring key to False.
Note that disabling this key does not prevent CloudShell from sending usage data to Quali, but you can prevent that from happening by disabling the EnableWatcher key.
To prevent CloudShell Monitor from collecting usage data:
Go to C:\Program Files (x86)\QualiSystems\CloudShell\Server\customer.config file, and add the following key:
<add key="AddUsageDataToMonitoring" value="False"/>- Save the file and restart the Quali Server service.
Online Help
Switching between online and offline help
CloudShell provides two help packages, an online package and an offline package. By default, the online package is used.
This key applies to the CloudShell Portal, TestShell Studio, and CloudShell Authoring components.
To use the offline help instead of the online help:
If CloudShell has been upgraded from version 8.0 or below, delete the KnowledgeBase folders from:
C:\Program FIles\QualiSystems\CloudShell\Portal\
C:\Program FIles\QualiSystems\CloudShell\
Place the offline help files in the appropriate folder:
On the CloudShell Server machine, create a folder named Knowledge Base in the appropriate path:
- For CloudShell Portal: C:\Program Files (x86)\QualiSystems\CloudShell\Portal
- For Resource Manager Client: C:\Program Files (x86)\QualiSystems\CloudShell\ResourceManagement
- For TestShell Studio and TestShell Runner: C:\Program Files (x86)\QualiSystems\TestShell\Studio
- For CloudShell Authoring: C:\Program Files (x86)\QualiSystems\CloudShell\Authoring
- If any of the clients are installed on a different machine, make sure to create the appropriate folder on the client machine.
Create the following folders in that folder:
- DRB
- Portal
- RM
- RUN
- ST
- Download the component's updated offline help package locally and unzip it. To download the offline help packages, click the View / Download All Help Versions link at the top of this page.
Place the unzipped folder's contents in the appropriate sub-folder. The folder structure is as follows (in blue):
- DRB - CloudShell Authoring help folder
- Portal - CloudShell Portal help folder
- RM - Resource Manager Client
- RUN - TestShell Runner help folder
- ST - TestShell Studio help folder
Configure CloudShell to use the offline help instead of the online help:
Open the relevant installation folder:
C:\Program Files (x86)\QualiSystems\CloudShell\Authoring
C:\Program Files (x86)\QualiSystems\CloudShell\Portal
C:\Program Files (x86)\QualiSystems\CloudShell\ResourceManagement
C:\Program Files (x86)\QualiSystems\TestShell\Studio (for TestShell Studio and Runner)
Open the customer.config file, and enter this key:
<add key="ShowOnlineHelp" value="False"/>- Restart the services of the updated components. You can do this by restarting the actual service or running the component's configuration wizard.
Using your own help files in CloudShell portal
You can use your own help content instead of CloudShell’s. You can switch back to CloudShell help at any time.
To use your own help content:
Open the C:\Program Files (x86)\QualiSystems\CloudShell\Portal\customer.config file, add the following key:
<add key="CustomizedHelpUrl" value="<help-site-url>"/>Where
<help-site-url>is the website URL to your web help content- Restart the CloudShell Portal IIS service.
To switch back to CloudShell help content:
Open the C:\Program Files (x86)\QualiSystems\CloudShell\Portal\customer.config file, remove the above key or replace it with:
<add key="CustomizedHelpUrl" value="Empty"/>- Restart the CloudShell Portal IIS service.
Registration, passwords, emails, and licenses
Enabling regular users to change their email address
Email defaults are read-only to all users, except administrators and domain administrators, who can allow regular users to change their email address, when the following key is turned on.
To enable regular users to change their email address:
Go to C:\Program Files (x86)\QualiSystems\CloudShell\Portal\customer.config file, and add the following key:
<add key="ChangeEmailEnabled" value="True"/>- Restart the CloudShell Portal IIS service.
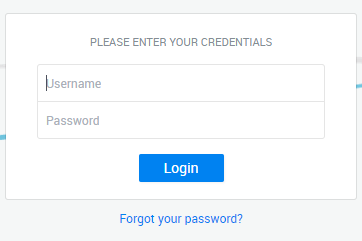
Enabling password reset
This key hides or shows the Forgot your password? link in the login page. To get the password reset option to work, you need to also configure the SMTP mail when installing or configuring the Quali Server. By default, this option is disabled.
To enable password reset:
Go to C:\Program Files (x86)\QualiSystems\CloudShell\Portal\customer.config file, and add the following key:
<add key="ResetPassword.Enabled" value="True"/>- Restart the CloudShell Portal IIS service.
Hiding the Change Password option
This key enables users to change their password from the user login menu in CloudShell Portal. By default, this option is enabled.
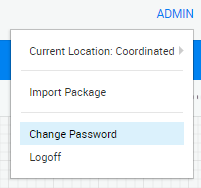
To hide the "Change Password" option:
Go to C:\Program Files (x86)\QualiSystems\CloudShell\Portal\customer.config file, and add the following key:
<add key="ChangePasswordEnabled" value="False"/>- Restart the CloudShell Portal IIS service.
Enabling registration
Before a new user can register, you need to create the default group and configure the following keys.
To enable registration:
- Go to C:\Program Files (x86)\QualiSystems\CloudShell\Portal\customer.config file, and add the following keys:
<add key="Registration.Enabled" value="True"/><add key="Registration.AdminEmail" value=""/>As well as configure the default role using the following key:
<add key="Registration.DefaultRole" value="Regular"/>Note: DefaultRole is relevant when the group does not exist.
In this case, the default group is called “Registered Users”.
- Restart the CloudShell Portal IIS service.
In the C:\Program Files (x86)\QualiSystems\CloudShell\Server\customer.config file, define the default role, the group’s name, the domain of the group, and the admin’s email address (according to the address set for a system administrator level user in the Resource Manager):
<add key="Registration.DefaultDomain" value="Global"/><add key="Registration.AdditionalGroup" value="External Users"/>Note: The default additional group is External Users. If you want users to be added to a different group, change the value of the key to another group name. To disable this option, leave this key's value empty.
Restart the Quali Server service.
In order to get to the registration page, you need to post a few parameters to it. Depending on your use case, you can either provide the user and email values (if you already know them) or leave them empty to let the user provide them. You must provide the group name that this user will be added to. You can use the following procedure to create a link that redirects the user to the registration form without providing the user and email details:
Add the following javascript function to the page from where you would like to redirect new users, and modify the default group value:
function NewUser(){var redirect = function(url, method) {var group = document.createElement('input');group.name = 'Group';group.value = 'Regular Users'; //the group name to add the user togroup.type = 'text';var form = document.createElement('form');form.method = method;form.action = url;form.appendChild(group);form.submit();};redirect('http://CloudShellPortal/Account/Register', 'post');}Note: The group name that you provide does not have to exist and it will be created upon the first registration.
The link that redirects to the registration form needs to call the above function and might look like this:
<a onclick="NewUser()">New user?</a>Then, when the user clicks on the link to the registration in his client’s website, he is directed to the CloudShell Registration page and is required to supply only a password.
After this, a new user should appear in the Users tab.
A different approach would be to create a registration form of your own. In this case your registration form might look like this:
<form action="http://localhost:801/Account/Register" method="post" novalidate="novalidate"><div><span>UserName</span><input name="Username" type="text" value="xx"></div><div><span>Email</span><input name="Email" type="text" value="[email protected]"></div><div><input name="Group" type="hidden" value="users"></div><button type="submit" class="btn">Register</button></form>When the user submits this form he will be redirected to the CloudShell Registration page where he will need to provide only the password.
Configuring the workspace to release the license after lying idle for a specified time
As of CloudShell 6.3, an administrator can configure the relevant applications (detailed below) to automatically release the license by updating a key in the customer.config file. The application remains open and when focus is returned to the application, a new license is retrieved. If none is available, a message is issued to notify the user that the license is missing.
By default, when the application has been lying idle for 65 minutes, the license is released.
In the following conditions, idle time is not counted:
- When TestShell Runner is under external control.
- When a Test or function is either running or has paused.
- When a seat license is being used.
Relevant applications:
- TestShell Studio
- TestShell Runner
- CloudShell Authoring
To change the default idle time for releasing the license in TestShell Studio and TestShell Runner:
Open the C:\Program Files (x86)\QualiSystems\TestShell\Studio\customer.config file, and add the following key:
<add key="IdleLicenseReleaseWatchdog.IdleTimeInMinutes" value="65"/>- Specify the value
0to disable the idle check. - Run the TestShell Studio Configuration Wizard.
To change the default idle time for releasing the license in CloudShell Authoring:
Open the C:\Program Files (x86)\QualiSystems\CloudShell\Authoring\customer.config file, and add the following key:
<add key="IdleLicenseReleaseWatchdog.IdleTimeInMinutes" value="65"/>- Run the CloudShell Authoring Configuration Wizard.
To disable the idle check:
- In the above key, set
value=0and run the CloudShell Authoring Configuration Wizard.
Setting the email validation pattern
You can specify the email validation pattern to limit the characters the user can enter for the email address (for example, to limit to a company-provided email address per specified string). The default email validation allows the user to insert any email, where the strings can be any character in any language or symbol (separated by "@" and ".").
To set the email validation pattern:
Open the C:\Program Files (x86)\QualiSystems\CloudShell\Portal\customer.config file, add the following key, and set the relevant value (for example, to limit users to enter email addresses that are specific to a particular company, such as Quali):
<add key="EmailValidationPattern" value="[^\s@]+@qualisystems\.com"/>- Restart the CloudShell Portal IIS service.
Enabling regular users to change email notifications
Administrators and domain administrators can allow users to change notifications about their sandboxes when the following key is turned on.
To enable regular users to change notifications about their sandboxes:
Open the C:\Program Files (x86)\QualiSystems\CloudShell\Server\customer.config file, and add the following key:
<add key="ReservationEmail.NonAdminCanChangeNotifications" value="False"/>- Restart the Quali Server service.
Setting email notification defaults for sandboxes
- The time stamps on sandbox events are in the time zone of the recipient. In the event of multiple recipients in different time zones, CloudShell will send a different email to each time zone's recipients.
- Email notifications require CloudShell SMTP mail configuration.
To set the email event defaults for sandboxes, for the sandbox's lifecycle events:
Open the C:\Program Files (x86)\QualiSystems\CloudShell\Server\customer.config file, and add the appropriate keys:
To send an email notification when the sandbox starts (On setup option):
<add key="ReservationEmail.SendNotificationOnStart" value="True"/>To send an email notification when the sandbox is active (On setup complete option):
<add key="ReservationEmail.SendNotificationOnSetupComplete" value="True"/>To send an email notification when teardown starts (Before end option):
<add key="ReservationEmail.SendNotificationBeforeEnd" value="True"/>To send an email notification x minutes before the teardown phase starts:
<add key="ReservationEmail.NotificationMinutesBeforeEnd" value="10"/>To send an email notification when the sandbox ends (On end option):
<add key="ReservationEmail.SendNotificationOnEnd" value="True"/>- Restart the Quali Server service.
To include a link to the sandbox in notification emails:
- Go to C:\Program Files (x86)\QualiSystems\CloudShell\Server\customer.config file, and add the following key:
Modify the key's values:
Parameter Parameter details protocolhttp or https if CloudShell Portal is set to use SSL PublicServerNameThe DNS name or IP address of the CloudShell Portal virtual front PortalPortThe port which CloudShell Portal is using (If the port is 80 or 443, remove this parameter and the colon from the key value). - Restart the CloudShell Server service.
<add key="PortalAddressLinkForEmails" value="protocol://Portal:PortalPort"/>
Enabling calendar events for future sandboxes
As an administrator you can configure CloudShell to send calendar invitations for future sandboxes via email. The invitations are suitable for both Outlook and Google calendars. All calendar invitations are sent to the owner of the sandbox only.
Email notifications can be created for sandboxes that were created either manually or via an API.
If you extend or end the sandbox, a new event notification will be sent, changing the event time or canceling the event. For more information about extending and ending sandboxes, see Extend and End Sandboxes.
Note: Email notifications require CloudShell SMTP mail configuration.
To enable the calendar event:
- Go to C:\Program Files (x86)\QualiSystems\CloudShell\Server\customer.config file, and add the following key:
- Restart the Quali Server service.
<add key="SendEmailForFutureReservations" value="True"/>
Disabling admin calendar event when user extends/cancels a sandbox
By default, whenever a user extends the duration of a sandbox or cancels a future one, the system administrator receives a calendar invite.
To disable the calendar event:
Open the C:\Program Files (x86)\QualiSystems\CloudShell\Server\customer.config file, and add the following keys:
<add key="ReservationEmail.SendNotificationOnReschedule" value="False"/><add key="ReservationEmail.OverrideSendNotificationOnRescheduled" value="False"/>- Restart the Quali Server service.
Adding additional recipients for sandbox notifications, in addition to the owner
There are two supported methods to specifying additional recipients that are to be emailed on all sandbox events in addition to the owner. The two methods can be used in conjunction.
To specify a hard-coded list of email addresses (the list items should be separated by a semi-colon ):
Open the C:\Program Files (x86)\QualiSystems\CloudShell\Server\customer.config file, and add the following key:
<add key="ReservationEmail.RecipientsToNotify" value="[email protected];[email protected]"/>- Restart the Quali Server service.
To set more general policies to inform admins and non-admins globally:
Open the C:\Program Files (x86)\QualiSystems\CloudShell\Server\customer.config file, and add the following key:
<add key="ReservationEmail.NotifySystemAdmins" value="True"/><add key="ReservationEmail.NotifyDomainAdmins" value="True"/>- Restart the Quali Server service.
Ensuring admin notifications even if a user disables them
The admin can specify that he wants to always get a notification for some sandbox events, regardless whether the user disables them. Set the below keys to True to have CloudShell send a notification email to the admin/domain admin when the event occurs, or False to only send notifications based on the sandbox end-user's settings.
By default, admin notifications are sent.
To ensure admin notifications even if user disables them:
Open the C:\Program Files (x86)\QualiSystems\CloudShell\Server\customer.config file, and add the following keys:
<add key="ReservationEmail.OverrideSendNotificationOnStart" value="True"/><add key="ReservationEmail.OverrideSendNotificationOnSetupComplete" value="True"/><add key="ReservationEmail.OverrideSendNotificationBeforeEnd" value="True"/><add key="ReservationEmail.OverrideSendNotificationOnEnd" value="True"/>- Restart the Quali Server service.
Sandbox API
Setting the response page size
The administrator can set the maximum amount of entries included in each response page, when running the sandbox output and sandbox events methods. By default, the response includes up to 1000 entries.
To set maximum entries per response page:
Open the C:\Program Files (x86)\QualiSystems\CloudShell\Server\customer.config file, add the following key, and set the relevant value:
<add key="DefaultSandboxApiPagingSize" value="1000"/>- Restart the Quali Server service.
Scheduling and Queuing
Job Scheduling is available as an add-on.
Customizing the schedule-ahead buffer for pending jobs
The scheduling and queuing engine continually tries to find open slots for pending jobs. By default, every 30 minutes. This configuration key enables you to determine the time interval at which the engine searches for available time slots.
For example, if a job has completed running its tests but the job’s duration hasn’t ended, the job slot is available. However, the next job in queue will have to wait either for the current job's duration to end or the scheduling and queuing engine to run it.
To customize the time limits for the schedule-ahead buffer for pending jobs:
Open the C:\Program Files (x86)\QualiSystems\CloudShell\Server\customer.config file, add the following key, and set the relevant value:
<add key="QacAllowedTimeFrameDurationInMinutes" value="120"/>- Restart the Quali Server service.
Setting allowed job overtime before termination
The SNQ engine can allow jobs some to go overtime, instead of terminating them.
This value, set by the admin, is used to add an additional overtime buffer for all jobs. Jobs that exceed their allocated time are considered overtime, and their owner receives a warning email. The buffer is specified as a percentage.
To set the job overtime buffer:
Open the C:\Program Files (x86)\QualiSystems\CloudShell\Server\customer.config file, add the following key, and set the relevant value:
<add key="ExecutionJobDurationOvertimePercentage" value="20"/>- Restart the Quali Server service.
Controlling the number of recently completed jobs displayed in the Job Scheduling page
The Job Scheduling page in the CloudShell Portal displays the currently running jobs for each suite, as well as a limited number of recently ended jobs. By default, the last two completed jobs will be displayed.
To change the number of completed jobs displayed:
Open the C:\Program Files (x86)\QualiSystems\CloudShell\Server\customer.config file, add the following key, and set the relevant value:
<add key="NumberOfEndedExecutionJobSetsToDislpay" value="4"/>- Restart the Quali Server service.
Working with local tests
By default, the Create Suite Template (TestShell) page in CloudShell Portal's Job Scheduling dashboard enables you to select only shared tests to add to the job. Adding this key enables you to select local tests as well.
To enable local test selection:
- Open the C:\Program Files (x86)\QualiSystems\CloudShell\Portal\customer.config file, and add the following key:
- Restart the CloudShell Portal IIS service.
<add key="EnableLocalTestBrowsing" value="True"/>
You must get the latest parameters for the local tests per the execution server on which they are stored.
To get environment variables into the batch files:
- Open the C:\Program Files (x86)\QualiSystems\CloudShell\Portal\customer.config file, and add the following key:
- Restart the CloudShell Portal IIS service.
<add key="LocalEnvironmentUserParameters" value="Get_UserName, Get_Password,..."/>
Separate the relevant parameters with a comma as in the example above.
For additional information, see Setting Up Execution Servers to Run Commands.
Locking a test for editing
This key enables you to configure if TestShell tests are locked for editing while they are being updated by other users.
Note that while a test is being edited, other users can still edit this test and save changes, but their changes will not be applied. Setting this key to True will pop up an error message if a second user tries to save a locked test and block the action.
Once the test is saved, all users with the required permission may edit the test.
You can enable Admin users to unlock tests. See Enabling TestShell admins to unlock tests in TestShell Studio.
To enable locking a test for editing in TestShell Studio:
- Open the C:\Program Files (x86)\QualiSystems\CloudShell\Server\customer.config file, and add the following key:
- Restart the Quali Server service.
- Rerun the TestShell Configuration Wizard if your TestShell Studio client is installed on a different machine than Quali Server.
<add key="EnableTestShellStudioAccessControl" value="True"/>
Enabling TestShell admins to unlock tests in TestShell Studio
To enable unlocking by an admin:
- Open the C:\Program Files (x86)\QualiSystems\CloudShell\TestShell\Studio\customer.config file, and add the following key:
- Restart the TestShell Studio client.
<add key="EnableAccessControlAdministration" value="False"/>
Configurations for running local tests
For additional information, see Working with local tests.
Suite notification default severity level
You can define the default notification severity level for your suite notification emails.
To set a default:
- Open the C:\Program Files (x86)\QualiSystems\CloudShell\Portal\customer.config file, and add the following key:
- Restart the CloudShell Portal IIS service.
<add key="SuiteEmailNotificationDefaultSeverityLevel" value="ErrorsOnly"/>
Other possible values are None, SuiteAndErrors, and All.
Setting the Test Execution Report Template for Automation Suite Tests
For additional information, see Setting the Test Execution Report Template for Automation Suite Tests.
Setting the maximum number of steps for test reports
Reports of very large TestShell tests (over 10,000 steps) may take a long time to open and in some cases, may not open at all. To prevent this from happening, it is recommended to set a limit on the maximum number of steps allowed in a test report.
The default is 10,000.
To set the maximum number of steps for test reports:
Open the appropriate file:
- For reports created in TestShell Studio and Runner: C:\Program Files (x86)\QualiSystems\TestShell\Studio\customer.config file.
- For reports created in CloudShell Portall automation suites: C:\Program Files (x86)\QualiSystems\CloudShell\Portal\customer.config file.
Add the following key:
<add key="MaxReportStepCount" value="10000"/>- Set the value, as appropriate.
- Run the TestShell Studio Configuration Wizard for Studio or Runner, or restart the CloudShell Portal IIS service for CloudShell Portal.
Setting the default Reporting Profile for automation suite jobs
This key sets the default logging profile for automation suite tests. For tests that are executed in TestShell Studio and Runner, the default logging profile is defined globally in the application itself .
The default value is: Results
To set the default Reporting Profile for jobs:
Open the C:\Program Files (x86)\QualiSystems\CloudShell\Portal\customer.config file, and add the following key:
<add key="LoggingProfile" value="Results"/>Possible values are:
are:- Results logs only the execution results (results of following tools: Pass, Fail, Text To Report, Criteria, Attributes).
- Measurements and Results logs execution results and measures of all tools with output.
- All logs all results and outputs of the test execution (including tools without outputs).
- None runs the test without logging any output or result.
- Set the value, as appropriate.
- Restart the CloudShell Portal IIS service.
Enabling non-admin users to edit and create suite templates
To enable non-admins to edit and create suite templates:
Open the C:\Program Files (x86)\QualiSystems\CloudShell\Portal\customer.config file, and add the following key:
<add key="AllowRegularUsersToEditSnQ" value="True"/>- Restart the CloudShell Portal IIS service.
Scheduling commands
Enabling concurrent blueprint scripts
Set this key to True to enable multiple blueprint script commands to run at the same time in a sandbox. This enables the Default Sandbox Setup script to run other scripts as part of its own execution.
This option is disabled by default.
Note: To enable a resource driver's commands to run concurrently, in Resource Manager Client, open the Resource Families explorer and in the resource model's Drivers tab, select Supports Concurrent Commands.
To enable blueprint scripts to run concurrently:
Open the C:\Program Files (x86)\QualiSystems\CloudShell\Server\customer.config file, and add the following key:
<add key="AllowConcurrentTopologyScriptCommands" value="True"/>- Restart the Quali Server service.
Search
It is possible to customize the resource search experience and scope using several configuration keys.
Showing/hiding the bulk add resources option in the search side pane
The functionality to add a bulk of resources at once to a sandbox can be useful, especially in cases where the user needs to add hundreds of ports, storage LUNs or any other type of device to a sandbox. In such a scenario, dragging them in one-by-one might not be relevant.
However, if that scenario is not relevant, you can disable this option for the user.
To disable the bulk add resources option:
Open the C:\Program Files (x86)\QualiSystems\CloudShell\Server\customer.config file, and add the following key:
<add key="ShowSearchMultiAdd" value="False"/>- Restart the Quali Server service.
Controlling the resource types the user can drag into the sandboxes
This can be useful if the admin wants to hide certain resources from the search pane results only, when the user is selecting which resource to add to his/her sandbox. In this manner, for example, it is possible to ensure that the user only uses the chassis/port level for certain device types, and avoid the confusing of many sub slot/blade/port group hierarchies.
To control the resource types the user can drag into sandboxes:
Open the C:\Program Files (x86)\QualiSystems\CloudShell\Server\customer.config file, and add the following key:
<add key="SearchOnlySearchables" value="True"/>- Restart the Quali Server service.
In the Resource Manager desktop client Resource Family's Parameters document, toggle the Searchable property of each resource family according to the required visibility.

Controlling which attributes to display as filters
As the user searches the database, automatic filtering attributes appear in the search panel and can be used to further focus the search. To avoid clutter, you can specify which attribute should be used for filtering in the Resource Manager Client.
To control which attributes to display as filters:
- Open the Resource Manager Client Attributes document and add the Displayed in Search Results rule to the relevant attributes.
Advanced: Controlling the number of attributes and values filters retrieved for search results
As the user searches the resources database, automatic attribute filters appear based on the search results. It is possible to configure the maximal number of these attribute filters and the maximal number of values for filtering. This can be useful if your resources have numerous relevant attributes which you want the user to be able to filter by, or if you want to reduce clutter and focus the user only on the most common attributes.
To control the maximum number of filtering attributes:
Open the C:\Program Files (x86)\QualiSystems\CloudShell\Server\customer.config file, and add the following key and set the value (the default is 10 attributes):
<add key="NumberOfTopAttributeNames" value="10"/>- Restart the Quali Server service.
To control the maximum number of possible values per attribute:
Open the C:\Program Files (x86)\QualiSystems\CloudShell\Server\customer.config file, and addAdd the following key and set the value (the default is 5):
<add key="NumberOfTopAttributeValues" value="5"/>- Restart the Quali Server service.
Single Sign On (SSO)
SSO/SLO configuration is available with CloudShell Premium Tier.
For information about configuring Single Sign-On and SAML, see Configuring Single Sign-On (SSO).