Associating Resources to Specific Execution Servers
For details about associating Apps or blueprints to execution servers, see Setting Up Execution Servers to Run Commands.
This article explains how to link a resource to a specific execution server or group of execution servers. This is especially useful in deployments that include multiple geographically-distributed sites, to ensure that distant lab resources are handled by an on premise execution server, to reduce latency and improve performance.
This is done by setting the same value on the Execution Server Selector attribute on the resource and on the suitable execution server(s).
Note: Resources based on 2nd Gen Shells include the Execution Server Selector attribute.
To associate a resource to an execution server:
Set the Execution Server Selector value on the execution server.
Open the Manage dashboard's Execution Servers>Servers page.
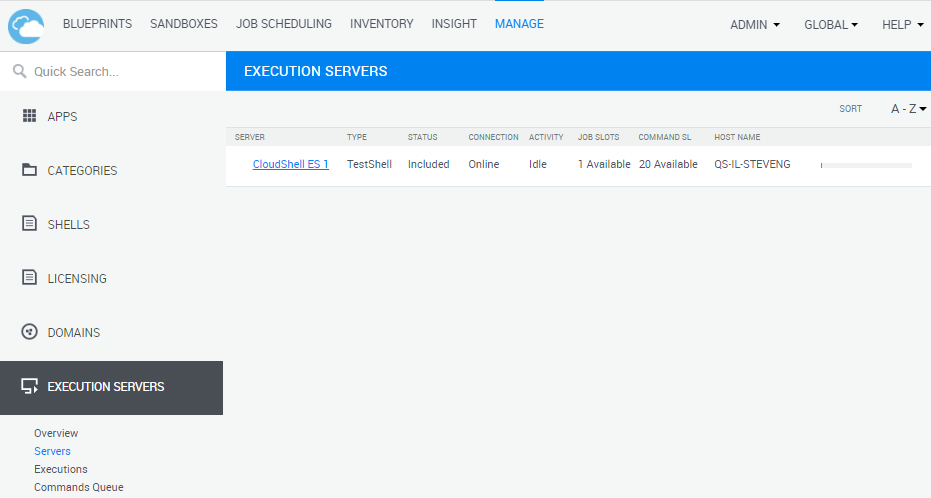
Click the suitable execution server.
The Attributes dialog box is displayed.
Specify the resource's domain in the Execution Server Selector attribute. For example: "London".
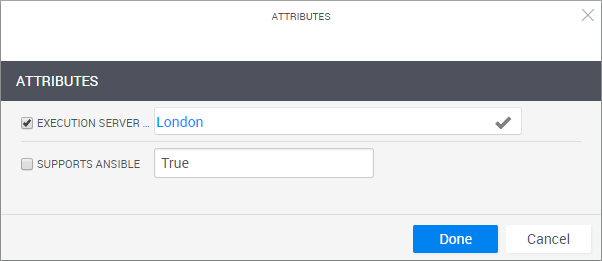
- Click Done.
Set the Execution Server Selector value on the resource.
- In the Inventory dashboard, in the Resources tab, make sure the resource is not currently reserved.
- Click the resource's menu button
 and select Discovery. If Discovery is unavailable, click Edit.
 - In the Execution Server Selector attribute, specify the same value you set on the execution server and rediscover the resource.
When running a command on the resource, CloudShell will use this execution server. If additional execution servers have the same attribute value, CloudShell will select the first available one.
In some scenarios, you may want to specify additional criteria for execution server selection. For example, an execution server in India that is running on a Windows OS. To achieve this, make sure the resource has these two selector attributes (for example, 'Lab Location' and 'OS'), with 'India' and 'Windows' as their values and at least one execution server with these two attributes selected and with the same values.
To achieve this, you will need to create the attributes with the Execution Server Selector rule and then add the attributes to the shell, as explained below.
Creating Execution Server Selector attributes
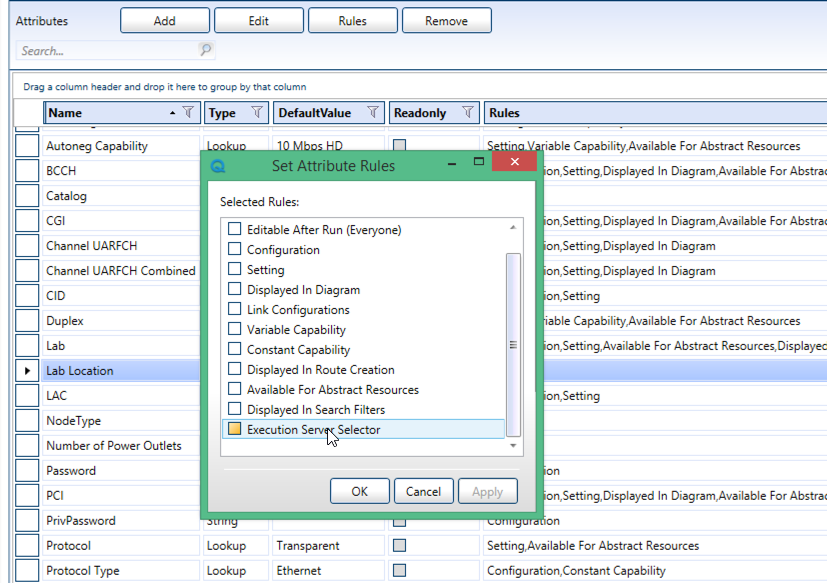
- In Resource Manager Client, open the Attributes tab.
- Create the new attribute. The attribute can be of any type except Password.
- Attach the Execution Server Selector rule to the attribute.

- Save your changes.
- Repeat steps a-d to add additional linking attributes.
Adding the Execution Server Selector attributes to resources
In order to use the Execution Server Selector attribute you created, you must first add the attribute to the resource's shell.
- To add attributes to a 2nd Gen shell, see Adding custom attributes to a Shell.
To add attributes to a 1st Gen shell:
- In Resource Manager Client, open the Resource Families explorer.
- Add the attributes to the relevant models/families.