Adding Automation Suites
You can create automation suite templates that users are able to run many times, or an ad hoc automation suite that runs only once. For additional information about ad hoc automation suites, see Running AdHoc Automation Suites.
Note: Admins can enable non-admin users to edit and create suite templates using the AllowRegularUsersToEditSnQ key - see Advanced CloudShell Customizations.
In this article:
Add a new automation suite
An automation suite must have at least one job that has a test. However, an automation suite can have multiple jobs, with each job containing multiple tests.
To add a new automation suite:
In CloudShell Portal, click Job Scheduling.
The Job Scheduling dashboard is displayed in the Executions page, listing the existing automation suites.
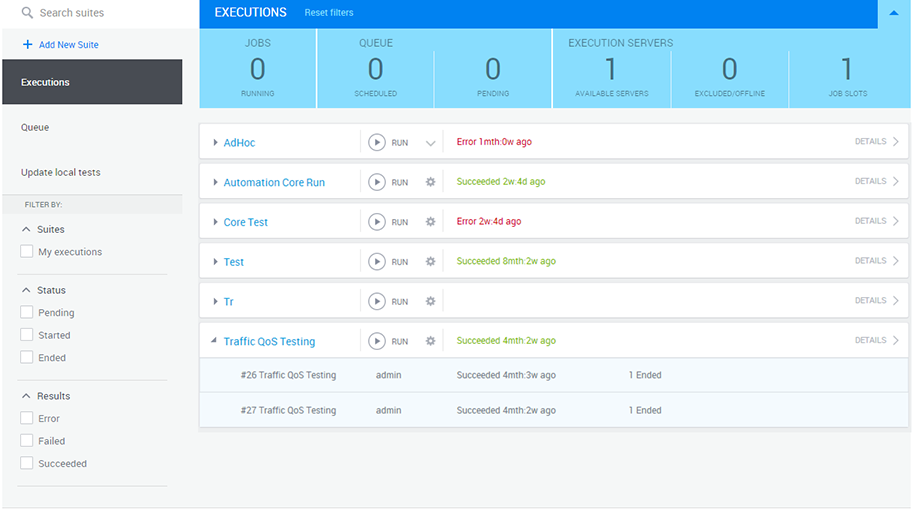
Click Add New Suite. If you have multiple execution server types, click the drop down list directly below the Add New Suite link and select the execution server type for the new automation suite template.
The Create Suite Template page is displayed. the suite's execution server type is displayed in brackets in the blue header.
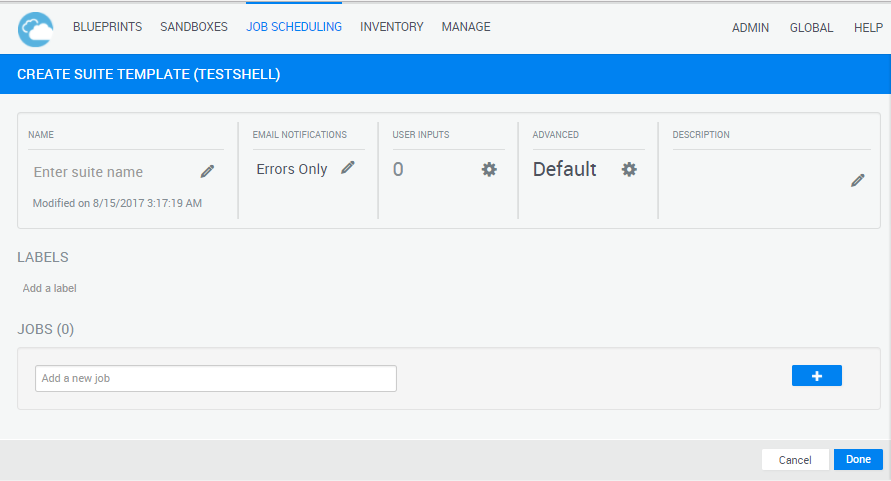
- Specify a Name for the automation suite.
To define the email notification the user executing the automation suite will receive, click the Email Notifications field and select one of the following options:
None
No notification will be sent.
Errors Only
(Default) Notification will be sent if an error occurs while trying to run a job within the suite. Test failure does not prompt an email notification.
Suite and Errors
Notifications will be sent:
- When the first job in the suite starts and the last job in the suite completes.
- If an error occurs while trying to run the suite or any of its jobs.
All
Notifications will be sent:
- When the first job in the suite starts and the last job in the suite completes.
- If an error occurs while trying to run the suite or any of its jobs.
- When each job in the suite starts and completes.
Note: Email notifications require CloudShell SMTP mail configuration and the executing user's profile to have an email address - see Managing CloudShell Users.
To view or edit the published input fields, in the User Inputs field, click
 and edit the required fields.
To define advanced scheduling options for the suite, in the Advanced field, click
 .
. The Advanced options window pops up.
Click the Scheduling button in the top right hand corner of the window and set the options:
Start Automatically (Not available for adhoc automation suites) Configure recurring executions of this suite. You can set the suite to execute on specific days or on a set interval. Remove old jobs from queue Define a timeout period for the suite. Jobs will be automatically removed from the queue when the time-out period ends.
Set specific timeframe Define a specific start and end time for the suite.
End sandbox when Job fails Select this option to end sandboxes automatically when the job fails.
Notes:- When the suite's execution time arrives, the suite enters the queue and waits for the right execution server and sandbox to be ready. For additional information, see Running Automation Suites.
- Additional scheduling options are available when running a custom execution of a template. For additional information, see Running Custom Automation Suites.
(Available for system administrators only; not available for adhoc suites) To change the template's owner, in the top right hand corner of the screen, click Permissions and specify the Domain and Owner of this automation suite. This option determines who can access and edit the automation suite template. By default, the owner is the user who created the automation suite template, but both the template's owner and the system administrator can edit the template.
- Optionally, enter a Description for the automation suite.
Optionally, to add a label to the suite, in the Categories area, click the Labels field, select a label from the drop down list or enter a new label name, and press [Enter]. Labeling suites enables users to filter the suites in the Job Scheduling dashboard.
- Next, add a job to the automation suite.
Add jobs to an automation suite
Jobs group together tests and execute them sequentially on the same execution server.
An automation suite must have at least one job. You can select the blueprint on which the job's tests will run and also a specific execution server to execute the job's tests. An automation suite's jobs run in parallel.
Note: Jobs do not run in parallel if they exceed the number of available job slots in the execution server, or if there is a reservation conflict for the resources in the linked blueprints.
To add a job to an automation suite:
In the Create Suite Template (TestShell) page, in the Jobs area, click the
 button.
The Jobs area expands.
- Enter the job's name.
- Optionally, enter a Description for the job.
To define a blueprint for the job, click the Blueprint field. From the Select blueprint side pane, select the blueprint and click Done.
Note: Execution cannot be initiated until the blueprint's resources are available and the blueprint can be reserved.
Test authors can prepare tests for execution in the Job Scheduling dashboard by recommending the most appropriate blueprint for each test. Every test can be linked to one or more recommended blueprints.
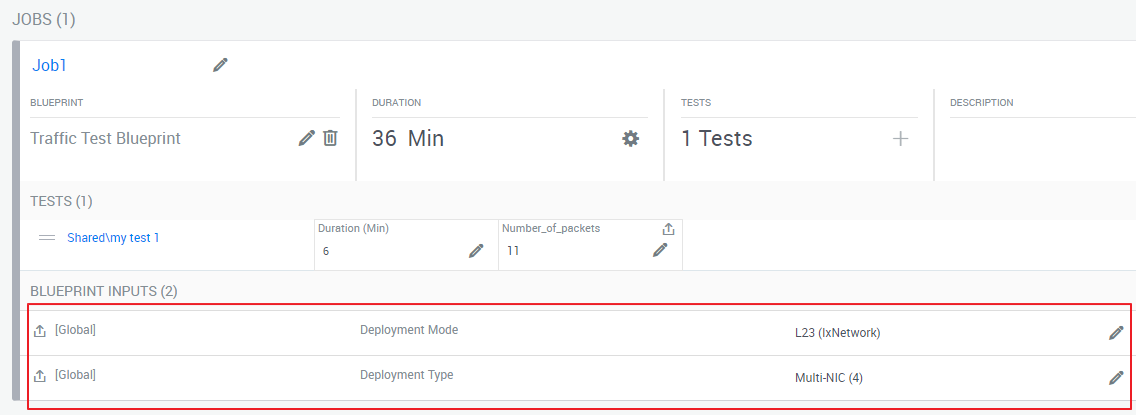
If the job is associated to a blueprint that has inputs (global/requirement/additional info), those inputs are displayed under the job. You can do the following:
- Specify the input values.
- Publish a variable as an input to the user running the job. To publish a variable, click the input's publish button (
 ).
).
For example, blueprint inputs "Deployment Mode" and "Deployment Type":
The job's total estimated duration is used to allocate available time slots. This comprises the estimated duration of each of the job's tests, with buffer and provisioning estimates (if the blueprint includes setup/teardown commands). Click the Duration field.
Click the Duration field.
The Set duration window pops up.
There are two different ways to specify the job's total estimated duration:
- In the Calculated method, the job's total duration includes the buffer period you define in the Set buffer field (default is 10 minutes), the total duration of the job's tests, and the provisioning period (the total setup and teardown duration if they exist in the blueprint associated with the job).
- Use the Specific method to set a specific number of weeks, days, hours, and minutes as the job's estimated duration. Note that the estimated duration cannot be less than the aggregated estimate of the job's tests. If existing, the provisioning duration is added to your estimated duration.
 More
MoreJobs that exceed their estimated duration are aborted unless they are extended successfully before completion.
If a sandbox ends while a job is still running, the job is terminated. To avoid terminating jobs too early, define additional overtime that will be added to all the jobs in the system.
Jobs that enter the overtime period send a warning notification to the initiator who can try to extend the sandbox from the CloudShell Portal.
Trying to run a job using the calculated duration method while the job’s tests have no estimated duration will result in an error.
To configure the job's execution settings, click the
 button. In the Execution Settings window, select the required settings.
Execution Servers Select the execution server(s) that will run the job's tests:
Specific: Select a specific execution server. You can select more than one execution server. Note that only execution servers of the type selected for the automation suite are displayed.
Note: To assign an execution server associated to a specific domain, attach to the job a blueprint that contains a resource that is set to be deployed by the desired domain's execution server via the Execution Server Selector attribute, as explained in Associating Resources to Specific Execution Servers.
- Any: The execution server is selected automatically by availability
Reporting Profile Determine what will be written in the execution report:
- None: Test results (passed/ failed/ completed/ error/ terminated) and measurements attributes
- Results: Test results (passed/ failed/ completed/ error/ terminated) and measurements attributes
- Measurements and Results: Test results (passed/ failed/ completed/ error/ terminated), transformations, text to report, measurement attributes, and captured image
- All: Every input received by the test and output sent during the test
Stop On Determine when the job will stop:
- Fail: The job stops running when a test fails
- Error: The job stops running when an error occurs or if the test encounters an error
- Next, add tests to the job in the automation suite.
Add tests to a job
Tests in a job run sequentially in their specified order.
To add a test to a job:
In the Create Suite Template (TestShell) page, in the Jobs area, click Tests.
The Add a test side pane is displayed, showing the Local and Shared folders of your TestShell Studio.
- Click a folder to display its tests. To view a test's description and number of parameters, click the More Info button.
Click a test.
The test is added to the job and displayed in the Tests area below.
In the Duration (Min) field to the right of the test, enter the estimated number of minutes needed for the execution of the test.
Note: If an estimated duration was set for the Studio test, that duration is displayed by default.
The test's duration period is added to the job's calculated duration.
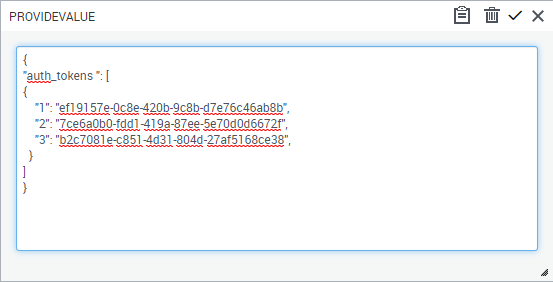
If any of the job's tests have inputs, those inputs are displayed in the job’s test input area. Note that password inputs are supported since CloudShell 8.3 and are encrypted both when typing and in transmission. You can do the following:
Specify the input values.
To utilize multiline variable input values of type String (see Variable types ) and JSON format, click the attribute's expand button to open the variable edit window, enter your value and click the check button.
For example:
Note: A "\\n" tag is automatically inserted between each line of text, indicating a line break, as shown below:

Warning: CloudShell does not allow you to directly specify a multiline variable input of type string using the edit button unless you add a "//n" tag at the end of each line.
Publish a variable as an input to the user running the job. To publish a variable, click the input's publish button (
).
For example, a "Port" variable is used:

Note: An administrator can configure the possible variables displayed to the user, and define dependencies between the variable fields. See Using JavaScript Extensibility to configure dependencies between test parameters.
Add additional tests to the job as appropriate.
Notes: The tests are executed in their order in the job. You can add the same test multiple times to the same job
- Close the Add a test pane.
- To change the execution order of the tests in the job, next to the test's name, click
 and drag the test to the required location.
 Click Done.
The following indication message is displayed:

The new automation suite is added to the Executions page.