Prepare and Reserve Blueprint
This section guides you on how to configure resources and services that enable remote connection to the devices and machines they represent, and how to connect to those devices from within CloudShell.
Note: The resource configuration steps must be performed for each resource for which you want to enable remote connection from CloudShell Portal.
To prepare and then reserve an blueprint:
In Resource Manager Client, open the Attributes page and make sure the following attributes are configured:
Attribute Attribute Type Rules User String Configuration, Setting Password Password Configuration, Setting
In the Resource Families pane, add these attributes to the families or models of the physical and virtual devices, and services to which end-users will connect. For example, the "bridge" family.
Note: Remote connections are enabled for services that have the Address field.
- In Resource Explorer, create a resource that uses a model from the "bridge" family.
- Double-click the resource, in the Parameters section, click the Address field and insert the IP with which you want to do a session (RDP, Telnet, SSH, and VNC).
- Click the Configuration button in the top right corner of the page. Insert into the new attributes the User Name and the Password for your session.
- Save your changes.
- Log in to CloudShell Portal and click Create Blueprint. Add the new resource.
- Reserve the new blueprint.
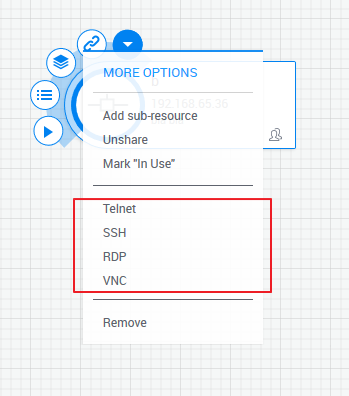
In the blueprint's diagram, hover over the resource. In the Actions menu, the options you configured are displayed: Telnet, SSH, RDP, and VNC. Each option redirects you to the IP address you specified in the resource.
For example, all four remote access terminals: