Customize Remote Access Terminals
You can both customize the default access terminals, and add and customize your own access terminals in order to access your devices remotely from CloudShell Portal. You can also control which access terminals are available for which sets of equipment, and more.
In this article:
Adding new remote access terminals
To add new remote access terminals:
- Go to the C:\ProgramData\QualiSystems\Settings\Global\ServerUniversalSettings.xml file.
Under the
<ConfigurationSection name="LinkApplications">tag, add the new remote access terminals.For example, to grant access to a webpage of a device, copy one of the default access terminals (for example, RDP/Telnet as shown in the Enable Remote Connection to/from CloudShell Portal), and simply change the settings described in the following steps.
- Perform the following steps in the line of the appropriate remote access terminals:
- Change the entire
patternvalue to be the URL of the desired webpage. Change the
nameandicon-keyto be the name you want to display for the remote access terminal in CloudShell Portal (for exampleWeb).For example:
<key name="Web" pattern="http://quali.com" icon-key="Web" />The specified link (in this case
Web) is displayed in the More Options list in CloudShell Portal (together with the predefined links to the default access terminals):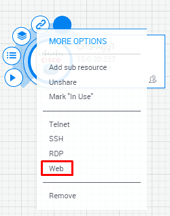
When you click the (“Web”) link in an active sandbox, the desired URL (quali.com for example) is displayed.
Customizing access terminals based on specific equipment
This section explains how to create an access terminal to a specific device. This is done by setting, in the remote access terminal, the name of an attribute that is on the resource so that when connecting to the device, the attribute value on the resource will be used.
To customize access terminals according to particular sets of equipment:
In Quali server, open the following file in a text editor C:\ProgramData\QualiSystems\Settings\Global\ServerUniversalSettings.xml file.
Embed attributes in the connection string in order to make it flexible according to the device from which you are trying to open an access terminal.
You may embed any attribute inside the connection string in order to make it dynamic and based on the device from which you need the access. Any attribute you have existing in CloudShell Resource Manager Client may be referenced inside the connection string by placing it inside curly brackets {}.
For example, you can edit:
<key name="Web" pattern="http://quali.com" icon-key="Web" />with dynamic attributes like this:
<key name="Web" pattern={web_URL_attribute} icon-key="{website name attribute}" />- Save the file.
In Resource Manager Client, create and attach your custom attribute to the resource models/families for which you would like to use the customized connection string.
To customize the common access terminals to specific sets of equipment, do the following:For each access to the device, create a unique set of attributes:
- {access type} User (for example, SSH User)
- {access type} Password (for examle, SSH Password)
- Attach the attributes to the specific resource models for which you would like to have this access option.
Save your changes.
Return to the ServerUniversalSettings.xml file, and add the attributes in {} inside the matching connection string. .
For example, attributes SSH User and SSH Password:
<key name="SSH" pattern="https://192.168.56.7:83/Qx/connect?qualix=192.168.84.41&qualixType=https&ssh{qid}&qtoken={qtoken}&hostname={Address}&protocol=ssh&port=22&username={SSH User}&password={SSH Password}" icon-key="SSH" />- Keep the original
UserandPasswordattributes in a resource model if you need some server-side operations on it (connecting routes/auto load, etc.). - Restart the Quali Server service to apply the changes.
Setting the QualiX remote connection browser's title
It is possible to customize the title of the browser tab that opens when clicking the remote access link.
To set the caption of the browser tab:
Use the
titletag to specify a CloudShell string attribute on the resource.The attribute's value will be used as the browser tab's title.
For example, Tag Title:
<key name="SSH" pattern="https://192.168.56.7:83/Qx/connect?qualix=192.168.84.41&qualixType=https&ssh{qid}&qtoken={qtoken}&hostname={Address}&protocol=ssh&port=22&username={SSH User}&password={SSH Password}&title={Tag Title} "icon-key="SSH" />Restart the Quali Server service.
This is how the title should look (assuming the attribute's value on the resource is "new title"):
